Using Windows Live Movie Maker you can create a good looking videos by making use of your digital Video clips or Photos and publish it on the web to share among your family,friends or even the whole world .
Windows Live Movie Maker wave 4 offers you various built-in settings that you can choose from when you’re ready to save your movie. But you can also save your movie with a custom setting you create. This lets you save your movie at a quality level and size that meets your specific needs and believe me creating a Custom setting is a very easy process.

How it works
- Download and Install Windows Live Wave 4
- Run Windows Live Movie Maker from Start –> Program files –> Windows Live
- After launch of Windows Live Movie Maker, Add some Videos or Photos and create your beautiful memories using tools provided
- After everything done, now its time to saving your videos using custom setting
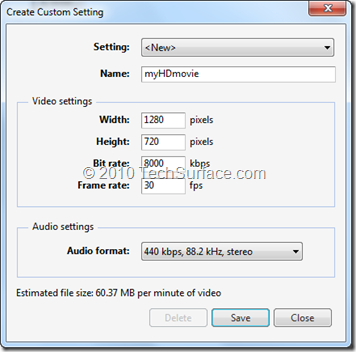
- Click on the Home tab, in the Sharing group, click Save movie, and then click Create custom setting.
- To create a new custom setting that’s based on an existing setting, click the Setting list, and then choose an existing setting.
- Enter the Name of your new setting in the Name Box
- Enter the values for your Video resolutions in Width and Height Field. * It always better to use same size as of the source video size.
- Enter the Bit rate for your project in Bite Rate Box. (The Bit rate of a movie is the key to the quality of the audio and video of that movie. Higher the Bit rate, Better the Quality and increment in the file size. Below is the suggested bit rate for Different Outputs. )
1250 kbps – VCD Quality
5000 kbps – DVD Quality
8000 kbps – 15000 kbps – HD TV Quality
29400 kbps – HD DVD Quality
40000 kbps – Blu ray Quality - Enter the Frame rate for your project in Frame Rate box. ( *Frame rate are number of Frames display or projected in One Second. The higher frame rate a movie has the smoother objects move in the movie. )
- Select the Audio format you want to use for your project. ( Higher the Bit rate, better the Sound Quality and increases file size )
- Click Save and Save. That’s all !

